HOW TO MAKE A VINTAGE BEDSIDE TABLE!
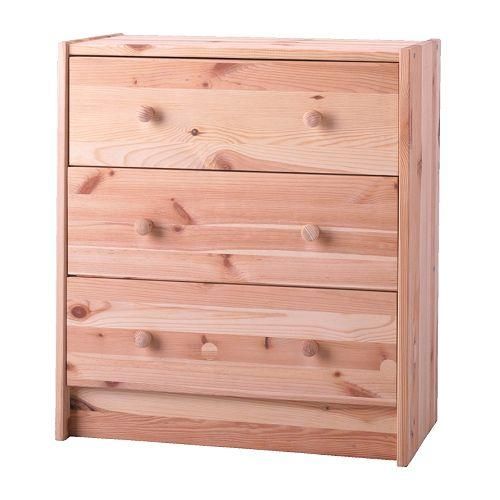
<p>Today I have for you a very original, stylish and atmospheric master class – you will learn how to make a vintage bedside table with your own hands! And you don't even need anything to cut - simply glue the finished parts and paint with the stain.</p><figure><a class="images-link" data-lightbox="gallery" href="https://abbigli.com/thumbs/qiScyuNQBL3Td2Uojs6Lu0NdRPk=/1ee0e52afad44f25bc7cd9e069f05c84" rel="nofollow"><img data-image="34430" src="https://abbigli.com/thumbs/unsafe/fit-in/1000x0/https://abbigli.com/thumbs/qiScyuNQBL3Td2Uojs6Lu0NdRPk=/1ee0e52afad44f25bc7cd9e069f05c84"></a></figure>
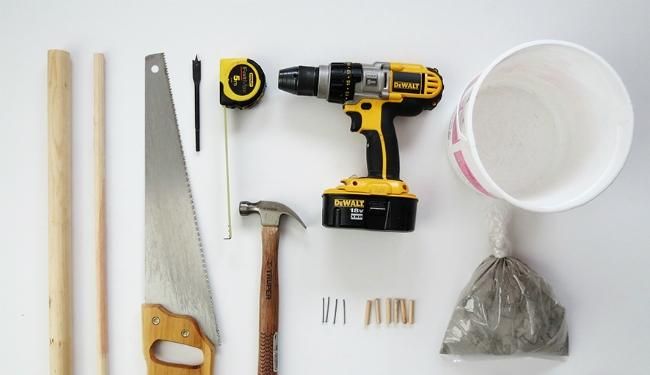
<p>In order to make a nightstand, you need:</p>
<p>- a plywood ( of the thickness of 12 mm or 18 mm) - 1 sheet of the size of 2440 × 1220 mm;</p>
<p>- 1 furniture legs, better with binding, 55-70 cm long;</p>
<p>- 2 furniture handles;</p>
<p>- sandpaper;</p>
<p>- a saw (if needed);</p>
<p>-a pencil and a ruler;</p>
<p>- a wood glue;</p>
<p>- a furniture coating(or any protective agent for wood inside).</p><figure><a class="images-link" data-lightbox="gallery" href="https://abbigli.com/thumbs/LWTLsTTi3zIhNy_-ywERKK2o76U=/3ad1da4b22b649e3965cea3e5d0729ac" rel="nofollow"><img data-image="34431" src="https://abbigli.com/thumbs/unsafe/fit-in/1000x0/https://abbigli.com/thumbs/LWTLsTTi3zIhNy_-ywERKK2o76U=/3ad1da4b22b649e3965cea3e5d0729ac"></a></figure>
<p>If you didn’t find any wooden legs, as it is shown in the photo, it is possible to use the metal ones. The first thing you should do is to buy a sheet of plywood, and at the same time find in the store if they have any material cutting service or you can cut it yourself.</p><figure><a class="images-link" data-lightbox="gallery" href="https://abbigli.com/thumbs/G0HxyXms7aDYeaiJob2z5Z5klnw=/021a2cacaae045fb939d531a93f8bd49" rel="nofollow"><img data-image="34432" src="https://abbigli.com/thumbs/unsafe/fit-in/1000x0/https://abbigli.com/thumbs/G0HxyXms7aDYeaiJob2z5Z5klnw=/021a2cacaae045fb939d531a93f8bd49"></a></figure>
<p>Look at the picture: the edges of some parts are cut at an angle of 45 degrees – you can do it using a circular saw. </p><figure><a class="images-link" data-lightbox="gallery" href="https://abbigli.com/thumbs/FV7PkqNcKEb6O_3nK749KBka7Sg=/e8da8fd833954151b8046da9f93644f3" rel="nofollow"><img data-image="34433" src="https://abbigli.com/thumbs/unsafe/fit-in/1000x0/https://abbigli.com/thumbs/FV7PkqNcKEb6O_3nK749KBka7Sg=/e8da8fd833954151b8046da9f93644f3"></a></figure>
<p>Glue the bottom part to the side ones, and the side parts to the upper one. When the glue dries well, stick the back part to the construction and wait for the glue to dry.</p><figure><a class="images-link" data-lightbox="gallery" href="https://abbigli.com/thumbs/pIBS4O5bPcrz_5D6qIeH9dghbaY=/fc94080527274917b8c233468e175b4d" rel="nofollow"><img data-image="34434" src="https://abbigli.com/thumbs/unsafe/fit-in/1000x0/https://abbigli.com/thumbs/pIBS4O5bPcrz_5D6qIeH9dghbaY=/fc94080527274917b8c233468e175b4d"></a></figure>
<p>While the glue dries cut the ready-made wooden legs to the desired length and it is better to do at an angle of 10 degrees. Then file them off with the help of sandpaper. </p><figure><a class="images-link" data-lightbox="gallery" href="https://abbigli.com/thumbs/oSelFwAkC2kdsOi9XB0ptcZrAEw=/150e717060b4438d97e9c974c40bb75d" rel="nofollow"><img data-image="34435" src="https://abbigli.com/thumbs/unsafe/fit-in/1000x0/https://abbigli.com/thumbs/oSelFwAkC2kdsOi9XB0ptcZrAEw=/150e717060b4438d97e9c974c40bb75d"></a></figure><p>Glue the legs to the table, departing approximately 8 cm from the edges. To secure them better, you can use screws (before bonding the main parts).</p><figure><a class="images-link" data-lightbox="gallery" href="https://abbigli.com/thumbs/a6zspEfSJTfUqDFVEO9S-lW2zeU=/0c60b996ee434bd2ab39948ad514a62f" rel="nofollow"><img data-image="34436" src="https://abbigli.com/thumbs/unsafe/fit-in/1000x0/https://abbigli.com/thumbs/a6zspEfSJTfUqDFVEO9S-lW2zeU=/0c60b996ee434bd2ab39948ad514a62f"></a></figure><p> Drill a hole into the front part of the drawer for attaching the knob. Put all the parts of the drawer together, using glue and insert it into the nightstand.</p><figure><a class="images-link" data-lightbox="gallery" href="https://abbigli.com/thumbs/ztyenNCQ4OE4M3ePbN4K-9sWKl8=/f2100e15500b468387be35f1a73afd01" rel="nofollow"><img data-image="34437" src="https://abbigli.com/thumbs/unsafe/fit-in/1000x0/https://abbigli.com/thumbs/ztyenNCQ4OE4M3ePbN4K-9sWKl8=/f2100e15500b468387be35f1a73afd01"></a></figure>
<p>You can paint the nightstand with the help of any wood paint, permitted for indoor use. Or you can lacquer it as well. Apply several layers of lacquer right on the polished plywood.</p><figure><a class="images-link" data-lightbox="gallery" href="https://abbigli.com/thumbs/KupGkw976dw4H_xl-s074R5KcVs=/92f6171d9ea643d1a927f041dbee5df2" rel="nofollow"><img data-image="34438" src="https://abbigli.com/thumbs/unsafe/fit-in/1000x0/https://abbigli.com/thumbs/KupGkw976dw4H_xl-s074R5KcVs=/92f6171d9ea643d1a927f041dbee5df2"></a></figure><p> Screw the knob into the drawer. And that’s all! GOOD LUCK!</p><figure><a class="images-link" data-lightbox="gallery" href="https://abbigli.com/thumbs/ZDpOECqWL0O-DOQSgfZ5g0x064U=/ed4b3471302f46429ec37ade97bc3dcb" rel="nofollow"><img data-image="34439" src="https://abbigli.com/thumbs/unsafe/fit-in/1000x0/https://abbigli.com/thumbs/ZDpOECqWL0O-DOQSgfZ5g0x064U=/ed4b3471302f46429ec37ade97bc3dcb"></a></figure><p>Thanks to <a href="http://www.diy.ru/blog/belinka_ru/post/8882/" rel="nofollow">http://www.diy.ru/blog/belinka...</a> for the photos:)</p>
Категория:Home