DIY: WOODEN CUP TREE RACK!
<p><br></p>
<p>You can store your coffee and tea cups on a shelf or in a cupboard, but they take so much space, and each time getting them out of there is not always convenient. I think, anybody will agree with me, that it would be much more convenient, when you could take cups right from the table. Today I’m going to show you how to make a wooden stand for cups with your own hands. It is such a useful interior item!</p>
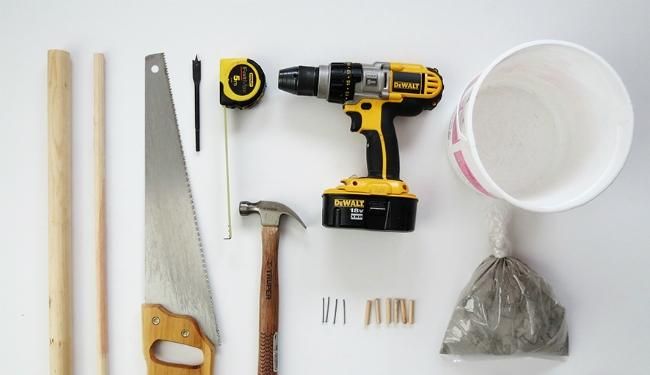
<p>So, to make it, you’ll need:</p>
<p>· 3 wooden poles of different diameters: 30 mm, 16 mm, 6 mm</p>
<p>· a ruler</p>
<p>· a pencil</p>
<p>· a hacksaw</p>
<p>· a stationery knife</p>
<p>· a drill with drills of 16 mm and 6 mm in diameter</p>
<p>· 4 nails (50 mm in length)</p>
<p>· a hammer</p>
<p>· a little cement mixture</p>
<p>· a spatula or trowel</p>
<p>· a masking tape</p>
<p>· a plastic container</p>
<p>· a liquid-vial indicator</p>
<p>· a joiner's glue</p>
<p>· a brush</p>
<p>· some mineral oil</p>
<p>· a sandpaper</p>
<figure><a class="images-link" data-lightbox="gallery" href="https://abbigli.com/thumbs/tqGHomY1CM80QNVGfsMO6Ezx2A4=/e204b483328c418eb4739871128b0c29" rel="nofollow"><img data-image="34204" src="https://abbigli.com/thumbs/unsafe/fit-in/1000x0/https://abbigli.com/thumbs/tqGHomY1CM80QNVGfsMO6Ezx2A4=/e204b483328c418eb4739871128b0c29"></a></figure>
<p>Process:</p>
<p>Out of the thickest pole will make a stem for the tree rack. Saw off a 30-mm pole of about 45 cm in length. We will make the branches of the tree-rack made out of the medium-sized poles, which we previously need to cut into lengths of about 20 cm. </p>
<figure><a class="images-link" data-lightbox="gallery" href="https://abbigli.com/thumbs/GQC-mIATTuHJGa4jQ0VKUqGq_24=/1762c8de3fbf474a9aea70b1cc813662" rel="nofollow"><img data-image="34205" src="https://abbigli.com/thumbs/unsafe/fit-in/1000x0/https://abbigli.com/thumbs/GQC-mIATTuHJGa4jQ0VKUqGq_24=/1762c8de3fbf474a9aea70b1cc813662"></a></figure>
<p>Carefully file off the blankets with the sandpaper. Draw a mark with the pencil on the point at a distance 2.5 cm from one end of the thick pole. This will be the top end of the stem. Then draw two more marks at a distance of 12 cm from each other. Make through-holes in the stem, using a drill and drills 16mm in diameter. </p>
<p>Note: the middle hole should be perpendicular to the outside ones.</p>
<figure><a class="images-link" data-lightbox="gallery" href="https://abbigli.com/thumbs/YveKqVdJPZD-yoHZu5Mx7QxuL_g=/383582c7e1a7422889e253c36bb83de2" rel="nofollow"><img data-image="34206" src="https://abbigli.com/thumbs/unsafe/fit-in/1000x0/https://abbigli.com/thumbs/YveKqVdJPZD-yoHZu5Mx7QxuL_g=/383582c7e1a7422889e253c36bb83de2"></a></figure>
<p>Then we need to install the limiters, so that the cups couldn’t fall from the "branches". Just make blind bores of 6 mm in diameter, closer to the ends of each branch. Cut off the 6-mm pole on the parts of about 2 cm in length previously.</p>
<figure><a class="images-link" data-lightbox="gallery" href="https://abbigli.com/thumbs/cwqaUqY1aBPGCkKIU1LoX4aoLJA=/6318a45e247740e698ae6bd50a1a81b3" rel="nofollow"><img data-image="34207" src="https://abbigli.com/thumbs/unsafe/fit-in/1000x0/https://abbigli.com/thumbs/cwqaUqY1aBPGCkKIU1LoX4aoLJA=/6318a45e247740e698ae6bd50a1a81b3"></a></figure>
<p>Hammer 4 nails crosswise into the lower edge of the thickest pole. </p>
<figure><a class="images-link" data-lightbox="gallery" href="https://abbigli.com/thumbs/JxprndUA9EwAH7vPfdGWHnM3x9E=/50c911fd2e434db0b92539dea87de113" rel="nofollow"><img data-image="34208" src="https://abbigli.com/thumbs/unsafe/fit-in/1000x0/https://abbigli.com/thumbs/JxprndUA9EwAH7vPfdGWHnM3x9E=/50c911fd2e434db0b92539dea87de113"></a></figure>
<p>Then make cement mixture and pour it into a plastic container with diameter of about 20 cm, so that the mixture fills the vessel at about 2-2.5 cm. </p>
<figure><a class="images-link" data-lightbox="gallery" href="https://abbigli.com/thumbs/USds31TzH2KNZ7wSeqpQvxlJIr4=/a8e5d3c415424534bf88debffb0014f6" rel="nofollow"><img data-image="34209" src="https://abbigli.com/thumbs/unsafe/fit-in/1000x0/https://abbigli.com/thumbs/USds31TzH2KNZ7wSeqpQvxlJIr4=/a8e5d3c415424534bf88debffb0014f6"></a></figure>
<p>Insert the central axis of the rack nails down, so that they are inside of the cement mixture. Align the pole and fix it in the upright position using a masking tape. Let the mixture solidify during 48 hours. </p>
<figure><a class="images-link" data-lightbox="gallery" href="https://abbigli.com/thumbs/yCptoXnGXLifMlcc3sjctHZ4sqI=/18d59444ed5f41f283b0fa417ed412b8" rel="nofollow"><img data-image="34210" src="https://abbigli.com/thumbs/unsafe/fit-in/1000x0/https://abbigli.com/thumbs/yCptoXnGXLifMlcc3sjctHZ4sqI=/18d59444ed5f41f283b0fa417ed412b8"></a></figure>
<p>Pull the rack out of the container, file off the cement base with the sandpaper. </p>
<figure><a class="images-link" data-lightbox="gallery" href="https://abbigli.com/thumbs/Bp2o4W0bcDQ0lTzhVRoPJFu0-i8=/b64edbb7163c48779ccc8fc7047712f7" rel="nofollow"><img data-image="34211" src="https://abbigli.com/thumbs/unsafe/fit-in/1000x0/https://abbigli.com/thumbs/Bp2o4W0bcDQ0lTzhVRoPJFu0-i8=/b64edbb7163c48779ccc8fc7047712f7"></a></figure>
<p>Insert the branches into the holes, fixing them with the joiner's glue and install the limiters, dropping a little glue in each hole.</p><figure><a class="images-link" data-lightbox="gallery" href="https://abbigli.com/thumbs/aZKBj1V7x4Gh2RzONO1yzp-TfqM=/f1fdfd6a6b964d4d859b8a1281d1c839" rel="nofollow"><img data-image="34215" src="https://abbigli.com/thumbs/unsafe/fit-in/1000x0/https://abbigli.com/thumbs/aZKBj1V7x4Gh2RzONO1yzp-TfqM=/f1fdfd6a6b964d4d859b8a1281d1c839"></a></figure><p> Allow the glue to dry and then cover all the wooden parts with the mineral oil – so that the tree rack looks better and can serve you longer.</p>
<figure><a class="images-link" data-lightbox="gallery" href="https://abbigli.com/thumbs/4dYtQpWuBMt-3McBcpnSYkKxHvU=/970a90fd0c674b94b76e1c3ed33b116d" rel="nofollow"><img data-image="34213" src="https://abbigli.com/thumbs/unsafe/fit-in/1000x0/https://abbigli.com/thumbs/4dYtQpWuBMt-3McBcpnSYkKxHvU=/970a90fd0c674b94b76e1c3ed33b116d"></a></figure>
<p>Photos by <a href="https://www.bobvila.com/authors/Ama-Ryllis" rel="nofollow">https://www.bobvila.com/author...</a></p>
Категория:Home