DIY: Handmade Leather Coasters!
<p>It often takes pretty much time and effort to create a warm and cozy atmosphere in the house. We sometimes underestimate the importance of some little details. Even coasters for a dining table are able to complement the look of the kitchen, or to create a cozy atmosphere on the workplace. Today I’d like to offer you a simple master class on creating a practical interior decorations or a nice gift to your friend.</p>
<p>Believe me, it won’t’ be difficult at all to make such leather coasters, which design has something in common with original Eastern patterns. Of course, you can use these two-sided items separately, but be sure that together they also create a very beautiful composition. Leather is rather expensive material, so you can use old things or artificial leatherette. </p><figure><a class="images-link" data-lightbox="gallery" href="https://abbigli.com/thumbs/LT23ESnl8ueyJL4KxhQOcV0p5BQ=/2dd27b2d03c04a32b4d653bcbe1645e0" rel="nofollow"><img data-image="34196" src="https://abbigli.com/thumbs/unsafe/fit-in/1000x0/https://abbigli.com/thumbs/LT23ESnl8ueyJL4KxhQOcV0p5BQ=/2dd27b2d03c04a32b4d653bcbe1645e0"></a></figure>
<p>Tip: there is no need to use 2 layers of the thick leather material, if you do not want to experiment with an extra color.</p>
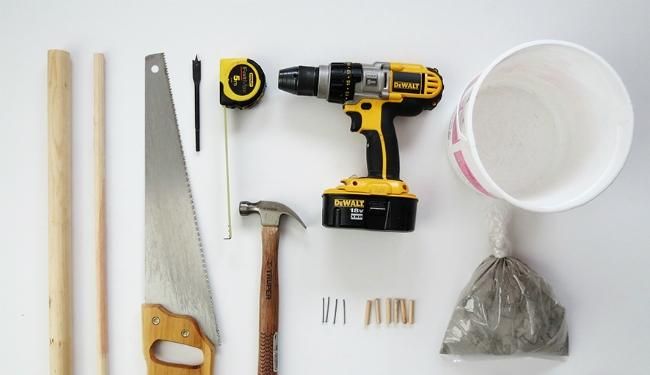
<p>To make such cute coasters with your own hands, you should take:</p>
<p>o leather or leatherette</p>
<p>o an adhesive tape</p>
<p>o a mat</p>
<p>o a knife</p>
<p>o a roulette</p>
<p>o scissors</p>
<p>o an acrylic fixative</p>
<p>o glue for leather and a brush</p><figure><a class="images-link" data-lightbox="gallery" href="https://abbigli.com/thumbs/H3-QplVhAaRQYLVcqOZSmhCg8ng=/1a39e8971c944a52b86f0775e2d527b8" rel="nofollow"><img data-image="34197" src="https://abbigli.com/thumbs/unsafe/fit-in/1000x0/https://abbigli.com/thumbs/H3-QplVhAaRQYLVcqOZSmhCg8ng=/1a39e8971c944a52b86f0775e2d527b8"></a></figure>
<p>You can use these templates or draw your own ones.</p><figure><a class="images-link" data-lightbox="gallery" href="https://abbigli.com/thumbs/CroYWdnDdJheRFakcnM_Zn0dP_Y=/4056b9df29684c95a753d7083fc25523" rel="nofollow"><img data-image="34198" src="https://abbigli.com/thumbs/unsafe/fit-in/1000x0/https://abbigli.com/thumbs/CroYWdnDdJheRFakcnM_Zn0dP_Y=/4056b9df29684c95a753d7083fc25523"></a></figure>
<p>1. Print the template on the desired scale. For example, I increase the picture up to 160%.</p>
<p>2. If you want to put two layers of the skin together, you can do it easily with the help of glue and a brush – but you should make it now, and not later.</p><figure><a class="images-link" data-lightbox="gallery" href="https://abbigli.com/thumbs/2zArZ2C4oClEgHobt4yCfe53tQQ=/f6a75c1f6fee4aa5b29b6a45dcd7c811" rel="nofollow"><img data-image="34199" src="https://abbigli.com/thumbs/unsafe/fit-in/1000x0/https://abbigli.com/thumbs/2zArZ2C4oClEgHobt4yCfe53tQQ=/f6a75c1f6fee4aa5b29b6a45dcd7c811"></a></figure>
<p>3. Fix the template onto the surface with an adhesive tape. It is important that each picture segment remains right on their places.</p><figure><a class="images-link" data-lightbox="gallery" href="https://abbigli.com/thumbs/M86LzK_W0vu4My0Ig08d3N-Hpkk=/23d9760e89b941e7b3c8fd0f0dae02b3" rel="nofollow"><img data-image="34200" src="https://abbigli.com/thumbs/unsafe/fit-in/1000x0/https://abbigli.com/thumbs/M86LzK_W0vu4My0Ig08d3N-Hpkk=/23d9760e89b941e7b3c8fd0f0dae02b3"></a></figure>
<p>4. Cut the future coasters out of the piece of soft mat, using a sharp knife and a ruler.</p><figure><a class="images-link" data-lightbox="gallery" href="https://abbigli.com/thumbs/VMKUs7cBNBHcyaWRcJ0s-3newHU=/83f263a23a6f410aabcfb1da4688fa69" rel="nofollow"><img data-image="34201" src="https://abbigli.com/thumbs/unsafe/fit-in/1000x0/https://abbigli.com/thumbs/VMKUs7cBNBHcyaWRcJ0s-3newHU=/83f263a23a6f410aabcfb1da4688fa69"></a></figure>
<p>Tip: do not worry about the cost of the material, if not every intersection is perfect - you can then trim all the minor bugs with the help of small scissors.</p><figure><a class="images-link" data-lightbox="gallery" href="https://abbigli.com/thumbs/NXTiRshh1w6cU41SNSeWBEGpvM4=/a10e9a11efe54225bb1b2a8fe27018ee" rel="nofollow"><img data-image="34202" src="https://abbigli.com/thumbs/unsafe/fit-in/1000x0/https://abbigli.com/thumbs/NXTiRshh1w6cU41SNSeWBEGpvM4=/a10e9a11efe54225bb1b2a8fe27018ee"></a></figure>
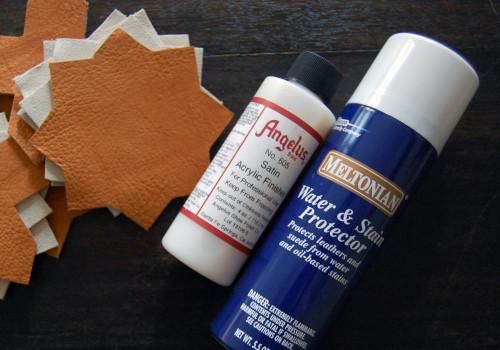
<p>5. The last step is to glue up the both sides with the acrylic fixative. Well, that’s all! Hope, you’ll enjoy such a creative process of making cute and useful handmade things! Good luck!</p><p>Thanks for the idea to <a href="http://www.designsponge.com/author/natalie-stopka" rel="nofollow">http://www.designsponge.com/au...</a></p>
Категория:Crafts