How to make a children’s table
<p>
A beautiful, useful and easy way to make
your wife and children happy - is to make DIY table for your home. Here’s a small
instruction which will help you understand step by step how to make a table by
your own! Hope, you’ll like it!</p>
<p>
</p>
<p>What you’ll need:<br>
• Board 20x95x2000 mm, 8
pcs<br>
• Screws 35x3,8 mm,
75 pcs<br>
• Varnish<br>
• The saw or jigsaw<br>
• Screwdriver<br>
• Bits<br>
• Drill<br>
• Sandpaper or sander<br>
• Brush<br>
• Tatters</p>
<p>
</p>
<p><br>
<strong>Step 1: Cutting the boards</strong><br>
•
Bulletin 790 mm long, cut to 9 pieces – this will be the surface of the table and
benches</p>
<p>• Support cross table, 4 pcs</p>
<figure><a class="images-link" href="https://abbigli.com/thumbs/0yF0QEYJnH7P4jvWFVWRRmHvYIw=/78e32924e2be41c1b36a7938297b2b1f" data-lightbox="gallery" rel="nofollow"><img src="https://abbigli.com/thumbs/unsafe/fit-in/1000x0/https://abbigli.com/thumbs/0yF0QEYJnH7P4jvWFVWRRmHvYIw=/78e32924e2be41c1b36a7938297b2b1f" data-image="34317"></a></figure>
<p>• Support longitudinal table, 2 pcs</p>
<figure><a class="images-link" href="https://abbigli.com/thumbs/X3zVc1EfpQyIzG0lj8wmCXdfwCE=/21a874253c0047f8afdec1d4c468ac87" data-lightbox="gallery" rel="nofollow"><img src="https://abbigli.com/thumbs/unsafe/fit-in/1000x0/https://abbigli.com/thumbs/X3zVc1EfpQyIzG0lj8wmCXdfwCE=/21a874253c0047f8afdec1d4c468ac87" data-image="34318"></a></figure>
<p>• Legs, 4 pieces</p>
<figure><a class="images-link" href="https://abbigli.com/thumbs/GkXj42J1O5RAJtzA9fN7DxGMK1c=/7843f78867404bc6bdac099c8ba26324" data-lightbox="gallery" rel="nofollow"><img src="https://abbigli.com/thumbs/unsafe/fit-in/1000x0/https://abbigli.com/thumbs/GkXj42J1O5RAJtzA9fN7DxGMK1c=/7843f78867404bc6bdac099c8ba26324" data-image="34319"></a></figure>
<p><br>
• Support benches, 2 pcs</p>
<figure><a class="images-link" href="https://abbigli.com/thumbs/PzwLzihKbOkIvQthlFATaa9S4Mc=/810e6c632a6446ff9c2808052147a5e6" data-lightbox="gallery" rel="nofollow"><img src="https://abbigli.com/thumbs/unsafe/fit-in/1000x0/https://abbigli.com/thumbs/PzwLzihKbOkIvQthlFATaa9S4Mc=/810e6c632a6446ff9c2808052147a5e6" data-image="34320"></a></figure>
<p><br>
<br>
Here's what happened.</p>
<figure><a class="images-link" href="https://abbigli.com/thumbs/oiBt_DNCII6mNqymcRPqRecEFSc=/2043a7a730c9402aacc5b08fb59fa25d" data-lightbox="gallery" rel="nofollow"><img src="https://abbigli.com/thumbs/unsafe/fit-in/1000x0/https://abbigli.com/thumbs/oiBt_DNCII6mNqymcRPqRecEFSc=/2043a7a730c9402aacc5b08fb59fa25d" data-image="34321"></a></figure>
<p><br>
<strong>Step 2: The support table</strong><br>
Select the
better side and put the "good" side down on something soft. Twist the screws of the table stand.</p>
<figure><a class="images-link" href="https://abbigli.com/thumbs/KyGgEbUCq5gQ5cb3BOI_Qoiqfic=/0790b6603ba74c1d9bcf712283724a7f" data-lightbox="gallery" rel="nofollow"><img src="https://abbigli.com/thumbs/unsafe/fit-in/1000x0/https://abbigli.com/thumbs/KyGgEbUCq5gQ5cb3BOI_Qoiqfic=/0790b6603ba74c1d9bcf712283724a7f" data-image="34322"></a></figure>
<p><strong>Step 3: Table</strong><br>
Align
the center board and screw it with two screws on each side. Then you can fasten the
other. Make
a gap between adjacent elements 5 mm.</p>
<figure><a class="images-link" href="https://abbigli.com/thumbs/XjOE1Q7zWIaFl09Sb7qIDCXMWZo=/803730082bc84de095550bb4921c8cbc" data-lightbox="gallery" rel="nofollow"><img src="https://abbigli.com/thumbs/unsafe/fit-in/1000x0/https://abbigli.com/thumbs/XjOE1Q7zWIaFl09Sb7qIDCXMWZo=/803730082bc84de095550bb4921c8cbc" data-image="34323"></a></figure>
<div><strong>Step 4: Legs</strong><br>
At
this point, we fasten to our children's table legs. Perhaps it is not necessary to
tighten all the screws once, try to turn the table leg and straighten it, then
you can finally tighten the screws.</div>
<figure><a class="images-link" href="https://abbigli.com/thumbs/SOfssPqlkmy7y1366tUSszVrkZM=/8fcf22be988f490cbfc7678a29ba2ac7" data-lightbox="gallery" rel="nofollow"><img src="https://abbigli.com/thumbs/unsafe/fit-in/1000x0/https://abbigli.com/thumbs/SOfssPqlkmy7y1366tUSszVrkZM=/8fcf22be988f490cbfc7678a29ba2ac7" data-image="34324"></a></figure>
<div><strong>Step 5: Bench</strong><br>
Turn the table upside
down. To
fix the bench support will be convenient to use cutting boards, can be seen in
the photo. Screw
on the 4 screws to each of the legs.</div>
<figure><a class="images-link" href="https://abbigli.com/thumbs/rsPYH_JS55-NHt2J4OhKm-6B9bY=/680a2514361f408eab9952db6fbebff2" data-lightbox="gallery" rel="nofollow"><img src="https://abbigli.com/thumbs/unsafe/fit-in/1000x0/https://abbigli.com/thumbs/rsPYH_JS55-NHt2J4OhKm-6B9bY=/680a2514361f408eab9952db6fbebff2" data-image="34325"></a></figure>
<div><strong>Step
6: Lower ligament</strong><br>
Anchoring
each side with trim boards using 2 screws.</div>
<figure><a class="images-link" href="https://abbigli.com/thumbs/Aghdkkok7SQpFSExgJlBbiELMvc=/e497a3c569a54d8aa2b4dc26a2aca9fe" data-lightbox="gallery" rel="nofollow"><img src="https://abbigli.com/thumbs/unsafe/fit-in/1000x0/https://abbigli.com/thumbs/Aghdkkok7SQpFSExgJlBbiELMvc=/e497a3c569a54d8aa2b4dc26a2aca9fe" data-image="34326"></a></figure>
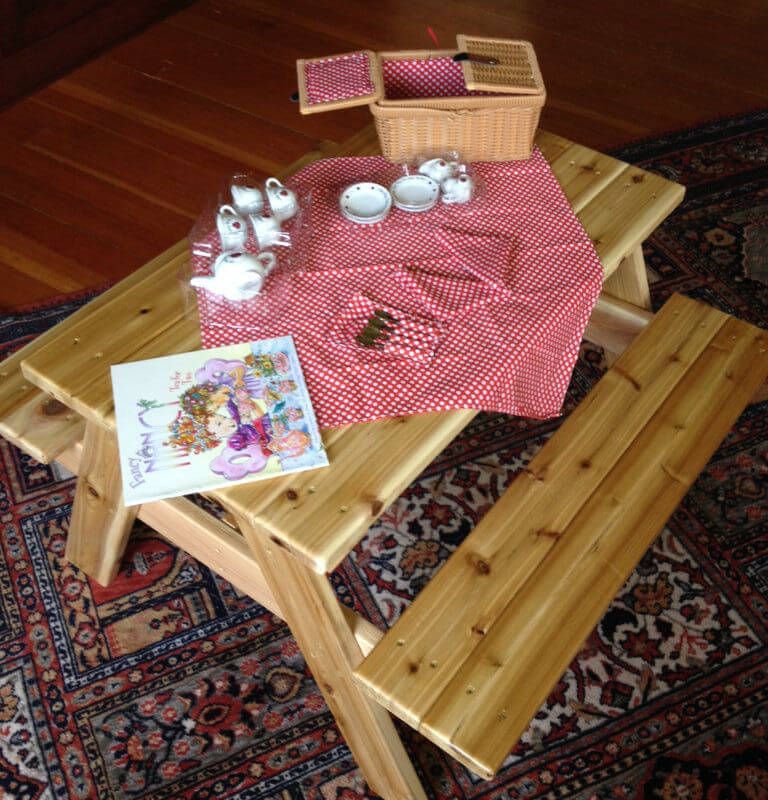
<div><strong><br></strong>
<strong>Step 7: Finishing work</strong><br>
Once
secured to the seat of our benches, it makes sense to carefully sand all. After
that, it makes sense to blow the dust formed during grinding and cover all with
varnish.</div>
<figure><a class="images-link" href="https://abbigli.com/thumbs/s0lE5qaTGY0q8LoRfXGPhya72qU=/1671922bd06042118ba1724b050b8e53" data-lightbox="gallery" rel="nofollow"><img src="https://abbigli.com/thumbs/unsafe/fit-in/1000x0/https://abbigli.com/thumbs/s0lE5qaTGY0q8LoRfXGPhya72qU=/1671922bd06042118ba1724b050b8e53" data-image="34327"></a></figure>
<p>
</p>
Категория:Home