DIY Tassel Earrings YSL
<p>Hello!</p>
<p>Earrings are one of the top accessories we have. And who doesn’t love them?! Walking around accessories shops I saw lots of earrings with different colors and shapes. But I was surprised by the unreasonable high prices. If you will take a closer look on those earrings at the stores you will see that they are very easy to make by yourself. That is exactly what I have decided to do and recreate the famous Yves Saint Laurent earrings. Those are customizable as well so you can improvise!</p>
<p><strong>Supplies:</strong><br>- <a href="http://lacis.com/catalog/data/AA_CordsThreadsNoveltyFlossWool.html" rel="nofollow">25 meters (79 feet) of bunka cord</a><br>- <a href="http://lacis.com/catalog/data/AC_TasselMaking.html" rel="nofollow">2 corrugated brass beads 5/8″</a><br>- <a href="http://lacis.com/catalog/data/AC_TasselMaking.html" rel="nofollow">2 corrugated brass caps 1/2″</a><br>- <a href="https://baublesandbeads.com/14kt-gold-filled-eye-pin-22-gauge-1-5/" rel="nofollow">2 eyepins</a><br>- <a href="https://baublesandbeads.com/14kt-gold-filled-kidney-wires-23mm/" rel="nofollow">2 earwires</a><br>- <a href="https://baublesandbeads.com/e6000-1oz-tube/" rel="nofollow">E6000 glue</a><br>- <a href="https://baublesandbeads.com/german-ergo-chainnose/" rel="nofollow">pliers</a><br>- <a href="https://baublesandbeads.com/japanese-style-wire-cutter/" rel="nofollow">wire clippers</a><br>- scissors</p><figure><a class="images-link" data-lightbox="gallery" href="https://abbigli.com/thumbs/XmyFPQ3HL9iD6Fke6vD16Thu0JU=/3a1789afae92475a80038fcd16b3762e" rel="nofollow"><img data-image="35581" src="https://abbigli.com/thumbs/unsafe/fit-in/1000x0/https://abbigli.com/thumbs/XmyFPQ3HL9iD6Fke6vD16Thu0JU=/3a1789afae92475a80038fcd16b3762e"></a></figure>
<p>1. Japanese bunka cord is very good for making tassels. The colors of the cord are up to you. Unravel the skeins first. Cut 2 3″ pieces and put them on the side. Cut the rest into multiple 8-10″ pieces. Make the two groups of strands, approximately 20 strands each.</p><figure><a class="images-link" data-lightbox="gallery" href="https://abbigli.com/thumbs/dESmqMm_q_TJ941D0qoXVnC3GWU=/32773e941c0e4bf985c3d892400263c8" rel="nofollow"><img data-image="35582" src="https://abbigli.com/thumbs/unsafe/fit-in/1000x0/https://abbigli.com/thumbs/dESmqMm_q_TJ941D0qoXVnC3GWU=/32773e941c0e4bf985c3d892400263c8"></a></figure>
<p>2. Lay the strands flat. Take the 3″ piece of a strand and tie the strands in the middle. Cut the excess.</p><figure><a class="images-link" data-lightbox="gallery" href="https://abbigli.com/thumbs/7roO_6gRsL_Q_VeS7LtSjpdrwHQ=/738797ee2e44491991089a0bdb695421" rel="nofollow"><img data-image="35583" src="https://abbigli.com/thumbs/unsafe/fit-in/1000x0/https://abbigli.com/thumbs/7roO_6gRsL_Q_VeS7LtSjpdrwHQ=/738797ee2e44491991089a0bdb695421"></a></figure>
<p>3. Pierce the eyepin through the bottom of the bead cap. Pour the small amount of E6000 glue into the bead cap. </p><figure><a class="images-link" data-lightbox="gallery" href="https://abbigli.com/thumbs/fvVDibjTjVRLk8VMEB53Mh2sUFs=/98d333c4fc0f470a981ac97b3999d31a" rel="nofollow"><img data-image="35584" src="https://abbigli.com/thumbs/unsafe/fit-in/1000x0/https://abbigli.com/thumbs/fvVDibjTjVRLk8VMEB53Mh2sUFs=/98d333c4fc0f470a981ac97b3999d31a"></a></figure>
<p>4. Put the tied strands into the bead cup and hold it for a bit so they will glue. Pierce the corrugated bead on the eyepin so it will be on top of the bead cup.</p><figure><a class="images-link" data-lightbox="gallery" href="https://abbigli.com/thumbs/tux5FqpN9rdfPcylyXNaRYFD-Y0=/f0ec4fb527d9456a85d25ba5a3f394b5" rel="nofollow"><img data-image="35585" src="https://abbigli.com/thumbs/unsafe/fit-in/1000x0/https://abbigli.com/thumbs/tux5FqpN9rdfPcylyXNaRYFD-Y0=/f0ec4fb527d9456a85d25ba5a3f394b5"></a></figure>
<p>5. Bend the eyepin 90 degrees to the left using the pliers. Then wrap the eyepin clockwise around the right side of the pliers.</p><figure><a class="images-link" data-lightbox="gallery" href="https://abbigli.com/thumbs/9R9xYwBA1TSz1nfP6XR-xyiclgo=/e48dd997f71d485c8f517990cf7674eb" rel="nofollow"><img data-image="35586" src="https://abbigli.com/thumbs/unsafe/fit-in/1000x0/https://abbigli.com/thumbs/9R9xYwBA1TSz1nfP6XR-xyiclgo=/e48dd997f71d485c8f517990cf7674eb"></a></figure>
<p>6. Wrap the eyepin all the way around twice creating a loop.</p><figure><a class="images-link" data-lightbox="gallery" href="https://abbigli.com/thumbs/Qz4Ew71QA8uq6zhXq8kCsPgGB0g=/769070c60f154638b25a21b4124fb46a" rel="nofollow"><img data-image="35587" src="https://abbigli.com/thumbs/unsafe/fit-in/1000x0/https://abbigli.com/thumbs/Qz4Ew71QA8uq6zhXq8kCsPgGB0g=/769070c60f154638b25a21b4124fb46a"></a></figure>
<p>7. Cut off the excess wire.</p><figure><a class="images-link" data-lightbox="gallery" href="https://abbigli.com/thumbs/bU8bRylFB22bPPnNBcXaLMy0uhA=/c20ecfca769e429e8a06f83b1c1731e2" rel="nofollow"><img data-image="35589" src="https://abbigli.com/thumbs/unsafe/fit-in/1000x0/https://abbigli.com/thumbs/bU8bRylFB22bPPnNBcXaLMy0uhA=/c20ecfca769e429e8a06f83b1c1731e2"></a></figure>
<p>8. Pierce the loop through the earwire. Now trim the strands to a desired length. Make sure the strands are even.</p><figure><a class="images-link" data-lightbox="gallery" href="https://abbigli.com/thumbs/5v9phZqqi4aDemVvCBbsLqwtbjw=/55cc0b7200a940efbf012e11c395f93d" rel="nofollow"><img data-image="35590" src="https://abbigli.com/thumbs/unsafe/fit-in/1000x0/https://abbigli.com/thumbs/5v9phZqqi4aDemVvCBbsLqwtbjw=/55cc0b7200a940efbf012e11c395f93d"></a></figure>
<p>9. Follow previous steps making the second earring. In the end make sure that the length of the both earrings is even.</p><figure><a class="images-link" data-lightbox="gallery" href="https://abbigli.com/thumbs/wJsHS1W2WKRj92hZMSdf-_aNCR8=/3e65cf21dc6b4601a31d6487487bbd5b" rel="nofollow"><img data-image="35591" src="https://abbigli.com/thumbs/unsafe/fit-in/1000x0/https://abbigli.com/thumbs/wJsHS1W2WKRj92hZMSdf-_aNCR8=/3e65cf21dc6b4601a31d6487487bbd5b"></a></figure>
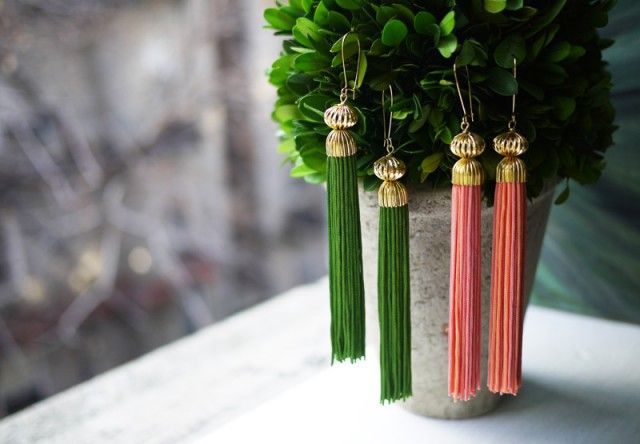
<p>Voila! Now you have this luxury and amazing accessory for your ears. They look classy and expensive and I am sure everybody will love them. Enjoy!</p><figure><a class="images-link" data-lightbox="gallery" href="https://abbigli.com/thumbs/QpQmyEbzq3jILR0YYdoq_viqDfs=/be267705f0dc44149ff6a1e5e0e22598" rel="nofollow"><img data-image="35593" src="https://abbigli.com/thumbs/unsafe/fit-in/1000x0/https://abbigli.com/thumbs/QpQmyEbzq3jILR0YYdoq_viqDfs=/be267705f0dc44149ff6a1e5e0e22598"></a></figure><p>Source: <a href="http://honestlywtf.com" rel="nofollow">honestlywtf.com</a></p>
Категория:Style