DIY Paper Marbling
<p>Hello everyone!</p>
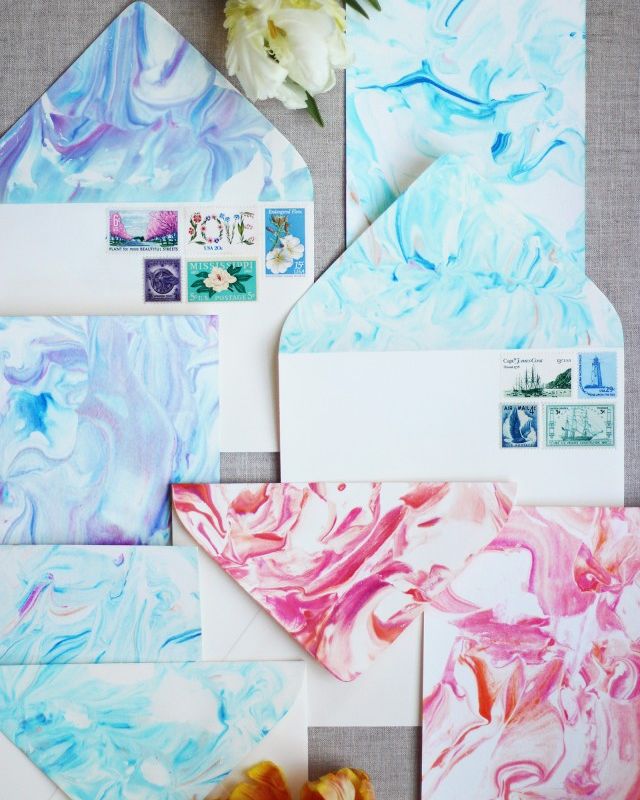
<p> Yessss this it a DIY tutorial on how to create your own cool patterns on the paper, because I got super bored by all the plain white envelopes and cheap postcards. Of course, there are plenty of both postcard and envelopes that looks amazing but have you seen the price tag on them?! This DIY will allow you to create something special for the little money. Don’t think I am being cheap when it comes to postcards for my friends and family, vice versa, I am spending time doing what I like when creating this paper marbling and I do it with love!</p>
<p> <strong>You will need:</strong><br>- foam shaving cream<br>- food coloring<br>- heavy weight paper<br>- painters tape or washi tape<br>- paper towels<br>- plastic or metal ruler<br>- plastic spatula<br>- rectangular baking dish<br>- toothpick (optional)</p><figure><img src="https://abbigli.com/thumbs/9DqA37DZyljJnDk0FKS0-6Iazzw=/145936d1ffdc4e809dfc782a372cdb06"></figure>
<p> Start to prepare the paper. Remember, you will need a thick paper for it. Mask the paper with the tape.</p><figure><img src="https://abbigli.com/thumbs/16U6AvAH10CRY9FA_w0txCGW1PY=/e193f59db5364287bac686945ace4efa"></figure>
<p> Spray a thick layer of shaving cream into a rectangular baking dish. Your paper should fit inside of it. Add a few drops of food coloring into the shaving cream. The gel coloring is the best but you can also use liquid ones. The color is for you to decide.</p><figure><img src="https://abbigli.com/thumbs/QqXJznJtX1GxUTF8ri3qvqTbzKw=/d5e3ae44d2004c4d841e9aadbeab3365"></figure>
<p> Start incorporating the color to the cream using a rubber spatula. Do not over mix it otherwise you won’t have the pattern.</p><figure><img src="https://abbigli.com/thumbs/rM-ZzMVESpRCY-4nPR5EGDcB1JY=/7073bd90e59e4b3ebe8716415b8512d6"></figure>
<p> When your base color is ready, put the other color on a toothpick os wooden skewer and gently add it to the different areas of the base.</p><figure><img src="https://abbigli.com/thumbs/eQ2n06wKvditc3TMahPaS4bVGM0=/341447bcecaa48e889714575fa87c5aa"></figure><p> </p>
<p> Place the paper, tape side up, onto the shaving cream.</p><figure><img src="https://abbigli.com/thumbs/XyWFijKLf9zZuUQsrplzLeNV95k=/8265c23a4d8e4ce7ac4bd6148d3bd930"></figure>
<p> Gently press the paper down with your fingers. Don’t leave it inside the dish for too long – it might get wet. Carefully lift the paper off holding the corner and place it on the paper towel.</p><figure><img src="https://abbigli.com/thumbs/72Mlx4MrfHy0qrlOTnVB1uqcEfQ=/8b35b529b3214781938c527ba9027b90"></figure>
<p> Scrape the shaving cream off in one sweeping motion using the ruler.</p><figure><img src="https://abbigli.com/thumbs/KpGzdv07DgMPPgk0Fih8QYvuFZY=/0a663b57f66549e3a8b7cf579930a3b3"></figure>
<p> With a fresh piece of paper wipe away any shaving cream excesses and let it dry for a couple of minutes.</p><figure><img src="https://abbigli.com/thumbs/ZCraP2wTrjndFyCiW7_5ndu2Szg=/c291d05e002b4e2fa8f0a410934b1e3b"></figure>
<p> While the first paper is drying come back to the shaving cream and make more. Change colors and patterns by adding more cream if necessary.</p><figure><img src="https://abbigli.com/thumbs/1Gj5tRMzbMX5gm45dP-WMUT_fmw=/5dc4d849b44b49ea8d050e2b4200a290"></figure><p> </p>
<p> Once all the papers have dried, place them under a pile of heavy books to flatten out.</p><figure><img src="https://abbigli.com/thumbs/6vGfb5x3k6_1Bs2Im63_dHh7jzw=/b0313f0fbfac4a9cb0e947506b67b053"></figure>
<figure><img src="https://abbigli.com/thumbs/FcbPyFdWD-6lCRQqHdvm5u0iZe8=/01ffde869cb848fd8a9453b4cf848a0e"></figure><p> Enjoy!</p>
<p>Source: <a href="http://honestlywtf.com/diy/diy-paper-marbling/">honestlywtf.com</a></p>
Категория:Crafts