Decoupage: LET'S DECORATE A SIMPLE CUTTING BOARD!
<p>Today, in this master class, you’ll learn how to make a gorgeous decoration of a simple cutting board, using decoupage technique and exquisite Provence style.</p>
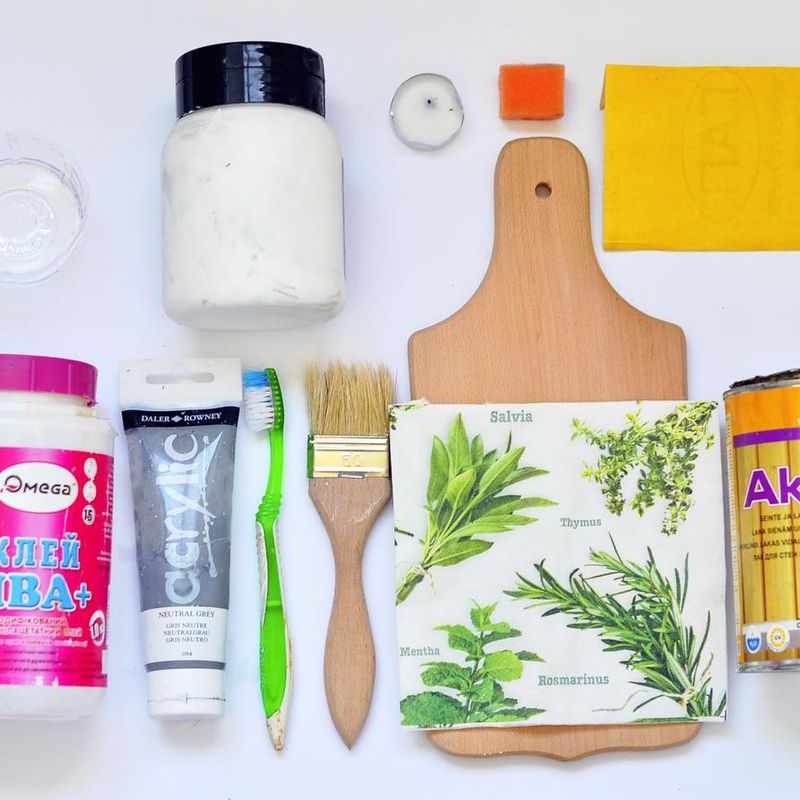
<p>You will need:</p>
<p>- a wooden cutting board (as for kitchen)</p>
<p>- a white acrylic paint</p>
<p>- a gray acrylic paint</p>
<p>- a paper napkin with the image of grass</p>
<p>- water</p>
<p>- an acrylic lacquer</p>
<p>- a PVA glue</p>
<p>- a narrow and a wide brushes</p>
<p>- a sponge</p>
<p>- a cup</p>
<p>- a candle</p>
<p>- a toothbrush</p>
<p>- sandpaper</p><figure><a class="images-link" data-lightbox="gallery" href="https://abbigli.com/thumbs/ei6AByCdKtafF6r5y2wkJrnnZhs=/12116724aa4142cdb008f934c106c659" rel="nofollow"><img data-image="34355" src="https://abbigli.com/thumbs/unsafe/fit-in/1000x0/https://abbigli.com/thumbs/ei6AByCdKtafF6r5y2wkJrnnZhs=/12116724aa4142cdb008f934c106c659"></a></figure>
<p>First you need to apply white paint onto the surface, using a sponge and pressing it along the board. </p><figure><a class="images-link" data-lightbox="gallery" href="https://abbigli.com/thumbs/PfwzHaP23kIS_ExDEy7LG5ffqNA=/8ac9bf5948534103850b190892790eed" rel="nofollow"><img data-image="34356" src="https://abbigli.com/thumbs/unsafe/fit-in/1000x0/https://abbigli.com/thumbs/PfwzHaP23kIS_ExDEy7LG5ffqNA=/8ac9bf5948534103850b190892790eed"></a></figure><p>Cut a desired pattern out of the tissue.</p><figure><a class="images-link" data-lightbox="gallery" href="https://abbigli.com/thumbs/14T5mluzbBGNplJr_MMHFnk4Y3Y=/51e45e72d01740ae835ebe0bd9b261e2" rel="nofollow"><img data-image="34357" src="https://abbigli.com/thumbs/unsafe/fit-in/1000x0/https://abbigli.com/thumbs/14T5mluzbBGNplJr_MMHFnk4Y3Y=/51e45e72d01740ae835ebe0bd9b261e2"></a></figure><p> The napkin has 3 layers, but we need only the top one, so separate it very carefully. </p><figure><a class="images-link" data-lightbox="gallery" href="https://abbigli.com/thumbs/OwH0I-Vq-0_gZdAoYXZCSQhNiNk=/ae1f937553934f1f8b82aad789306b2b" rel="nofollow"><img data-image="34358" src="https://abbigli.com/thumbs/unsafe/fit-in/1000x0/https://abbigli.com/thumbs/OwH0I-Vq-0_gZdAoYXZCSQhNiNk=/ae1f937553934f1f8b82aad789306b2b"></a></figure><p>Then make a liquid cream consistency of the PVA glue and some water in a cup. Put the layer with the picture onto the board and make a drop of the glue on the image, using a brush. </p><figure><a class="images-link" data-lightbox="gallery" href="https://abbigli.com/thumbs/VWUNkeTtDYy30pyqTNO6CF1KbQM=/993d415f59a64e4ca75af85cb27325ca" rel="nofollow"><img data-image="34359" src="https://abbigli.com/thumbs/unsafe/fit-in/1000x0/https://abbigli.com/thumbs/VWUNkeTtDYy30pyqTNO6CF1KbQM=/993d415f59a64e4ca75af85cb27325ca"></a></figure><p>Spread the liquid with the brush, so that the image sticks to the board without any creases.</p><figure><a class="images-link" data-lightbox="gallery" href="https://abbigli.com/thumbs/D8b_jN0qzTBgepHxubwd9nCLfiE=/18ff7a6ba8364310957c2ebe3f1561ca" rel="nofollow"><img data-image="34360" src="https://abbigli.com/thumbs/unsafe/fit-in/1000x0/https://abbigli.com/thumbs/D8b_jN0qzTBgepHxubwd9nCLfiE=/18ff7a6ba8364310957c2ebe3f1561ca"></a></figure><p> Then you can do the same with one more pattern. </p><figure><a class="images-link" data-lightbox="gallery" href="https://abbigli.com/thumbs/84t6E2ThsJ5hdV34LfognOE2YTo=/b55bd8aedf4948ee9fe86a218a2b67ba" rel="nofollow"><img data-image="34361" src="https://abbigli.com/thumbs/unsafe/fit-in/1000x0/https://abbigli.com/thumbs/84t6E2ThsJ5hdV34LfognOE2YTo=/b55bd8aedf4948ee9fe86a218a2b67ba"></a></figure><p>Using a simple candle, rub the edges of the board and then apply there bit acrylic paint. </p><figure><a class="images-link" data-lightbox="gallery" href="https://abbigli.com/thumbs/BeWgV3laa2VUwqQ57P4j5tkdWto=/5ef8da03759844ad8e968493e7416c88" rel="nofollow"><img data-image="34362" src="https://abbigli.com/thumbs/unsafe/fit-in/1000x0/https://abbigli.com/thumbs/BeWgV3laa2VUwqQ57P4j5tkdWto=/5ef8da03759844ad8e968493e7416c88"></a></figure><p>Apply the gray paint onto the other parts of the board. </p><figure><a class="images-link" data-lightbox="gallery" href="https://abbigli.com/thumbs/oaZkCXiTKiPFirUjhSrgo3P5NOg=/af94eb09cf0340358dd58898938b4410" rel="nofollow"><img data-image="34363" src="https://abbigli.com/thumbs/unsafe/fit-in/1000x0/https://abbigli.com/thumbs/oaZkCXiTKiPFirUjhSrgo3P5NOg=/af94eb09cf0340358dd58898938b4410"></a></figure><figure><a class="images-link" data-lightbox="gallery" href="https://abbigli.com/thumbs/cexReziYMensE4f9eExMGdzSrTA=/1acab21490df4091a8e027bf93102b25" rel="nofollow"><img data-image="34364" src="https://abbigli.com/thumbs/unsafe/fit-in/1000x0/https://abbigli.com/thumbs/cexReziYMensE4f9eExMGdzSrTA=/1acab21490df4091a8e027bf93102b25"></a></figure><p>Rub the edges of the board using a piece of sandpaper.</p><figure><a class="images-link" data-lightbox="gallery" href="https://abbigli.com/thumbs/7ABxrjCz1sbY1Go8jigXFDWp9FQ=/6032502ab53f4de68333b71e809fccbf" rel="nofollow"><img data-image="34365" src="https://abbigli.com/thumbs/unsafe/fit-in/1000x0/https://abbigli.com/thumbs/7ABxrjCz1sbY1Go8jigXFDWp9FQ=/6032502ab53f4de68333b71e809fccbf"></a></figure><p> The places where the candle was applied should turn white. Then you can put some gray acrylic paint onto the toothbrush and with the help of your thumb make a few chaotic splashes on the board, so that it looks like a vintage thing.</p><figure><a class="images-link" data-lightbox="gallery" href="https://abbigli.com/thumbs/G3t_dcD32OpaG7RsWTTR4BYnFjw=/378ad25731bd44f99c4e24402cc9adb9" rel="nofollow"><img data-image="34366" src="https://abbigli.com/thumbs/unsafe/fit-in/1000x0/https://abbigli.com/thumbs/G3t_dcD32OpaG7RsWTTR4BYnFjw=/378ad25731bd44f99c4e24402cc9adb9"></a></figure><p> Use the paint of the white color then. </p><figure><a class="images-link" data-lightbox="gallery" href="https://abbigli.com/thumbs/d7_fhlCpWCjU9Hxm48ChSR-yUIo=/9405b7c1b02c49fab0263519619bfd9a" rel="nofollow"><img data-image="34367" src="https://abbigli.com/thumbs/unsafe/fit-in/1000x0/https://abbigli.com/thumbs/d7_fhlCpWCjU9Hxm48ChSR-yUIo=/9405b7c1b02c49fab0263519619bfd9a"></a></figure><p>Apply the finishing layer on the board, using acrylic lacquer. </p><figure><a class="images-link" data-lightbox="gallery" href="https://abbigli.com/thumbs/Fal3o_Vgjusty4xYnfBSvXYcx_s=/5c05e2ee05d7426c86a17e2c17e1b2a7" rel="nofollow"><img data-image="34368" src="https://abbigli.com/thumbs/unsafe/fit-in/1000x0/https://abbigli.com/thumbs/Fal3o_Vgjusty4xYnfBSvXYcx_s=/5c05e2ee05d7426c86a17e2c17e1b2a7"></a></figure><p>And that’s all! A cute handmade decorative board in vintage style is ready! Good luck!</p><p>Thanks to <a href="http://www.diy.ru/post/8136/" rel="nofollow">http://www.diy.ru/post/8136/</a> for the idea</p>
Категория:Crafts