BRIGHT DIY: FRUITY WOODEN JEWELRY BOXES!
<p>Hello, everyone! Today, I would like to show you how to make gorgeous jewelry box. And to make it with your own hands, you will need very simple materials. Of course, it is very easy to find wooden bracelets in any costume jewelry shop – that will be one of the main materials for the master class! </p>
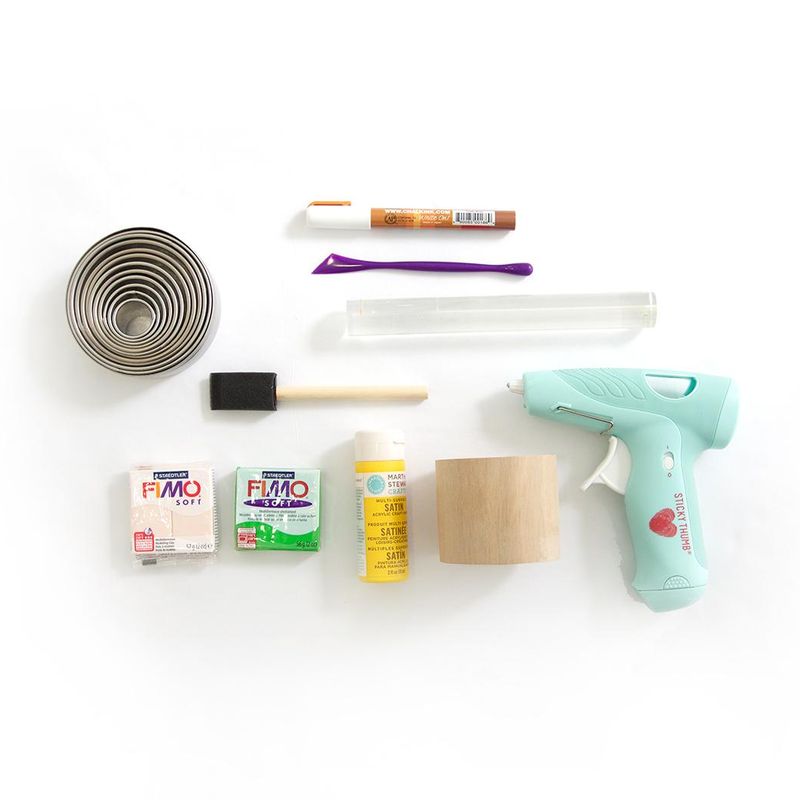
<p>You will need to take:</p>
<p>- a wooden bracelet </p>
<p>- hot gluing gun</p>
<p>- tools for working with clay</p>
<p>- polymer clay of various colors</p>
<p>- paints</p>
<p>- round cookie cutters</p>
<p>- brushes for painting</p>
<p>- a white marker</p><figure><a class="images-link" data-lightbox="gallery" href="https://abbigli.com/thumbs/RgAyX4XNj_kvrXNouX-WRLAhjuw=/5bf2acee6ddb48588b3db89ae15579e4" rel="nofollow"><img data-image="34565" src="https://abbigli.com/thumbs/unsafe/fit-in/1000x0/https://abbigli.com/thumbs/RgAyX4XNj_kvrXNouX-WRLAhjuw=/5bf2acee6ddb48588b3db89ae15579e4"></a></figure>
<p>Roll out a thin layer of polymer clay using a rolling pin and then with the help of the wooden bracelet cut a circle out – you will get the bottom for the box.</p><figure><a class="images-link" data-lightbox="gallery" href="https://abbigli.com/thumbs/dF2xlOVsra9L93M1CYpIoqnW5Fg=/989199f8c05a4706816f99d8df526cd3" rel="nofollow"><img data-image="34566" src="https://abbigli.com/thumbs/unsafe/fit-in/1000x0/https://abbigli.com/thumbs/dF2xlOVsra9L93M1CYpIoqnW5Fg=/989199f8c05a4706816f99d8df526cd3"></a></figure><p> Bake it, following the manufacturer's instructions.</p><figure><a class="images-link" data-lightbox="gallery" href="https://abbigli.com/thumbs/02u7WrqW47fNj3ZYYLlO0kCES1w=/6a8d39d6b5114d1eb458a6ce37cc0cb4" rel="nofollow"><img data-image="34567" src="https://abbigli.com/thumbs/unsafe/fit-in/1000x0/https://abbigli.com/thumbs/02u7WrqW47fNj3ZYYLlO0kCES1w=/6a8d39d6b5114d1eb458a6ce37cc0cb4"></a></figure><p> The next step is to paint the bracelet with yellow paint and draw rhomb-shaped patterns on its outer surface using a white marker. </p><figure><a class="images-link" data-lightbox="gallery" href="https://abbigli.com/thumbs/gRB93xU3ACvx3p-RSEixU7XT2KQ=/c6c89dfbb0764b30b09c40c37c47753e" rel="nofollow"><img data-image="34568" src="https://abbigli.com/thumbs/unsafe/fit-in/1000x0/https://abbigli.com/thumbs/gRB93xU3ACvx3p-RSEixU7XT2KQ=/c6c89dfbb0764b30b09c40c37c47753e"></a></figure><p>After you insert the baked clay circle inside the bracelet, secure it with hot glue.</p><figure><a class="images-link" data-lightbox="gallery" href="https://abbigli.com/thumbs/gVpJiq-KRd8c0rRwvIuO_GLO-jo=/afede5e5f5824a98995c10593edb47ac" rel="nofollow"><img data-image="34569" src="https://abbigli.com/thumbs/unsafe/fit-in/1000x0/https://abbigli.com/thumbs/gVpJiq-KRd8c0rRwvIuO_GLO-jo=/afede5e5f5824a98995c10593edb47ac"></a></figure>
<p>Take two round cookie cutters – the bigger one should approximately correspond to the outer diameter of the bracelet, and the smaller one – to the internal. </p><figure><a class="images-link" data-lightbox="gallery" href="https://abbigli.com/thumbs/_46k6o-TenR4ove4eWWl1eVA55I=/93ca79020c0c43f2a0d08e829727a877" rel="nofollow"><img data-image="34570" src="https://abbigli.com/thumbs/unsafe/fit-in/1000x0/https://abbigli.com/thumbs/_46k6o-TenR4ove4eWWl1eVA55I=/93ca79020c0c43f2a0d08e829727a877"></a></figure><p>Using the forms, squeeze circles out of salad polymer clay and then bake them, following the necessary instructions.</p><figure><a class="images-link" data-lightbox="gallery" href="https://abbigli.com/thumbs/5wkYh0z8Z286Y4LeDQzT1ZIQXhQ=/69e8c67e9da245c389182c40a2b947f5" rel="nofollow"><img data-image="34571" src="https://abbigli.com/thumbs/unsafe/fit-in/1000x0/https://abbigli.com/thumbs/5wkYh0z8Z286Y4LeDQzT1ZIQXhQ=/69e8c67e9da245c389182c40a2b947f5"></a></figure><p> Glue them together. </p><figure><a class="images-link" data-lightbox="gallery" href="https://abbigli.com/thumbs/WxfLoYw2kUDgRtnLSBqZ89G7rIk=/fdf2f61d3d9c4aaab41ff8eeefa4d66e" rel="nofollow"><img data-image="34572" src="https://abbigli.com/thumbs/unsafe/fit-in/1000x0/https://abbigli.com/thumbs/WxfLoYw2kUDgRtnLSBqZ89G7rIk=/fdf2f61d3d9c4aaab41ff8eeefa4d66e"></a></figure><p>Then, using a knife or a scalpel you can proceed to cut the leaves out of polymer clay.</p><figure><a class="images-link" data-lightbox="gallery" href="https://abbigli.com/thumbs/V2Z07DBjtZorMcp2TLoMKnyeE5U=/fd1e105d4a464942b7b6f54d43bda5d3" rel="nofollow"><img data-image="34573" src="https://abbigli.com/thumbs/unsafe/fit-in/1000x0/https://abbigli.com/thumbs/V2Z07DBjtZorMcp2TLoMKnyeE5U=/fd1e105d4a464942b7b6f54d43bda5d3"></a></figure><p> After you make it, bake the leaves and then glue them to the jewelry box lid. </p><figure><a class="images-link" data-lightbox="gallery" href="https://abbigli.com/thumbs/fj8qQiBlernVXJFfLb0N-DbUqFc=/03fa14b43ffe418e80007aceda0866c1" rel="nofollow"><img data-image="34574" src="https://abbigli.com/thumbs/unsafe/fit-in/1000x0/https://abbigli.com/thumbs/fj8qQiBlernVXJFfLb0N-DbUqFc=/03fa14b43ffe418e80007aceda0866c1"></a></figure>
<p>Paint one more bracelet, but with pink paint and draw black dots-seeds on its surface. Make a lid out of green polymer clay and paint wavy parallel lines on top of it, as on the watermelon rind.</p><figure><a class="images-link" data-lightbox="gallery" href="https://abbigli.com/thumbs/sBUjHCJJJSn1TFubGuf0-EPXCuA=/7debeb6b86ed445bbd8b89a6f13a5577" rel="nofollow"><img data-image="34575" src="https://abbigli.com/thumbs/unsafe/fit-in/1000x0/https://abbigli.com/thumbs/sBUjHCJJJSn1TFubGuf0-EPXCuA=/7debeb6b86ed445bbd8b89a6f13a5577"></a></figure>
<p>Paint the next bracelet with peach paint, make a lid out of clay of the same color. And the last step is to glue a small leaf on top. </p><figure><a class="images-link" data-lightbox="gallery" href="https://abbigli.com/thumbs/b5aXNAN_4GknIWhtboXw-SHvEY8=/d960e392277743f59cf03f4aa3293038" rel="nofollow"><img data-image="34576" src="https://abbigli.com/thumbs/unsafe/fit-in/1000x0/https://abbigli.com/thumbs/b5aXNAN_4GknIWhtboXw-SHvEY8=/d960e392277743f59cf03f4aa3293038"></a></figure><p>That’s all! Look, how cute they are!</p><figure><a class="images-link" data-lightbox="gallery" href="https://abbigli.com/thumbs/X4YRQiZ7s8mdtcn7DC0nSUFZvdI=/2b312e63162742edb53492aaf3e7930d" rel="nofollow"><img data-image="34577" src="https://abbigli.com/thumbs/unsafe/fit-in/1000x0/https://abbigli.com/thumbs/X4YRQiZ7s8mdtcn7DC0nSUFZvdI=/2b312e63162742edb53492aaf3e7930d"></a></figure><p>Thanks to <a href="http://damasklove.com/fruity-wooden-bracelet-trinket-boxes/" rel="nofollow">http://damasklove.com/fruity-w...</a> for such an interesting idea!</p>
Категория:Crafts