Beautiful lamp with your own hands
<h2>Beautiful lamp with your own hands</h2>
<ul><li><strong> </strong>Are you a creative person?</li><li>Do you have original ideas, but don’t know how to make it real?</li><li>Or you just wanted to spend your time with greed and you need original ideas…</li></ul>
<p> So you are on the right tutorial article. Here you will find an instruction how to make a lamp and how to make a lampshade by yourself. It’s a good alternative of gift or of a part of home interior. I have used this tutorial for my own house interior; I am very responsible approach to the question of the interior of my house. And I always try to create some interesting and original ideas for my house; because my house is my castle and all we know that East or west- home is best! So using this example I had made DIY lampshade and nobody has the same. </p>
<p>Okay, let’s go! </p>
<p>There are 2 the most beautiful and creative (in my horrible humble opinion) ways of DIY lamp shades. </p>
<p><em>And for the first you need:</em></p>
<ul><li>jars of different sizes;</li><li>moss;</li><li>artificial flowers and plants;</li><li>a dense tourniquet;</li><li>glitter, sequins;</li><li>the silhouette of the fairy printed on the printer;</li><li>cardboard;</li><li>PVA glue;</li><li>brush;</li><li>glue gun;</li><li>flameless LED candles on batteries.</li></ul>
<p><strong> The process of manufacturing a DIY lampshade.</strong></p>
<figure><img data-image="37260" src="https://abbigli.com/thumbs/NiD0R66B0DY2ty027k1s1Q0maFo=/3c66bf7af0f04cf6859b112c057a152a"></figure>
<ol><li>Take the foam brush. Cover a thin layer of PVA-glue on the inner walls of a clean jar.<figure><img data-image="37252" src="https://abbigli.com/thumbs/9xKloCYEhYff9Xo3WFYg_9dDAWw=/4b8984938f434c8d88a83c634b3f5803"></figure></li><li>Don’t wait for the glue to dry out; we immediately pour into the capacity sequins and patches.<figure><img data-image="37253" src="https://abbigli.com/thumbs/NAhBDUJO_1DtiLdWYRf2ztnLpI0=/787360f497ad4381a3ff5c48db5b3fe5"></figure></li><li>Close the jar with a lid and shake it to make the glitter stick to the walls and bottom. Remains of sequins we spill out. Wait when the glue will dry completely.<figure><img data-image="37254" src="https://abbigli.com/thumbs/KzdJ02SFUjXYWzMBQTx_HVfl7vM=/f97ff6c8fdde41aca57edc8094d30a8d"></figure></li><li>Cut out a piece of cardboard that would fit inside the jar. This will be the basis. Moss and artificial plants glue to it with the help of glue-gun.<figure><img data-image="37255" src="https://abbigli.com/thumbs/V-ZX1NBT0SM21TBSVYoIZrpEIAQ=/1bd5d1124f3b4fca894eb43cbdf9aad2"></figure></li><li>Cut out the silhouette of the fairy, which is printed on the printer. There are a lot of such stereotyped figures on the Internet.<figure><img data-image="37256" src="https://abbigli.com/thumbs/dCc8_ddBbgS_Ui-YUYX9fyWyN-o=/582bb4fadfdd4e9fb7a8b77d941a0db7"></figure></li><li>Stick the fairy to the cardboard base, as close to the edge as possible.<figure><img data-image="37257" src="https://abbigli.com/thumbs/oRzrp6axQ4X4SCPiO6WZmsjfGG0=/cb7e742619d640cd825421194abd7a8f"></figure></li><li>Put all this into the jar. Also put the artificial LED candle into the jar.<figure><img data-image="37258" src="https://abbigli.com/thumbs/VnI1r7boglCV0qCokRLpbhnZ330=/fdef7584d1d14f43af5bf142e53e7260"></figure></li><li>Glue the rope to the lid of the vessel, if you want you can wrap it around the artificial vine. Close the jar with the lid. Enjoy the sight of the night forest fairy.<figure><img data-image="37259" src="https://abbigli.com/thumbs/0oz1ZYlz2CEOgehlRtWXjzZj9r8=/681cd55dfc964fa89d74a0fb756febc5"></figure></li></ol>
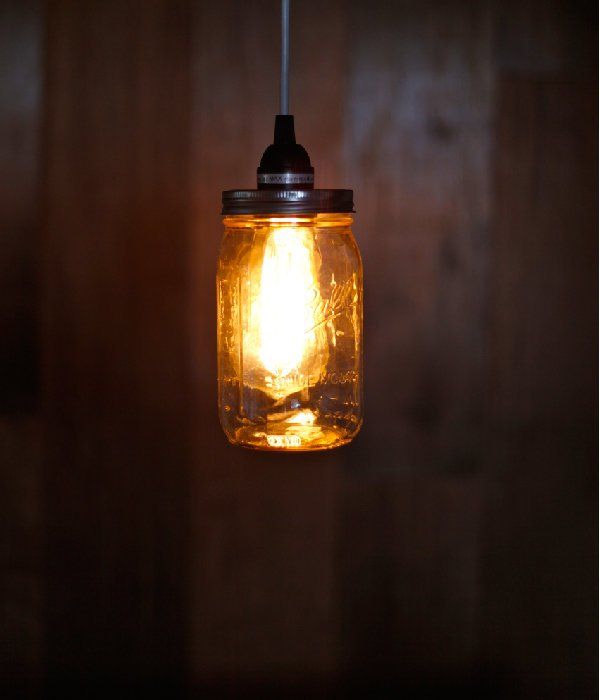
<p><em>For the second variant you need:</em></p>
<ul><li>liter jar with a lid of steel color on the twist (euro cover);</li><li>pliers;</li><li>a hammer;</li><li>tongs;</li><li>scissors-cutters;</li><li>marker;</li><li>wire with a plug and socket;</li><li>A light bulb.</li></ul>
<p><strong> The process of manufacturing a DIY lamp.</strong></p>
<figure><img data-image="37261" src="https://abbigli.com/thumbs/3LkJ72OqilJ-Xhv16MgilhVBDxU=/45bc98f66c704efb9d68866f595c8b95"></figure>
<ol><li>Attach the rim of the cartridge, to which the bulb will be attached, to the center of the outside of the lid on the jar. Circle the circle using marker.<figure><img data-image="37262" src="https://abbigli.com/thumbs/_gzOKva-KrEyod5ocae8-fCj6SE=/6b36c24704d643d282c8d8cdca9e1eed"></figure></li><li>With your left hand, take the nail, attach to the line on the lid. Hammer on the nail, making a through hole. Hole over the entire drawn circle. The more of them, the easier it will be to tear down the center.<figure><img data-image="37263" src="https://abbigli.com/thumbs/mUHLwvlRhBN21oD7dQVWf6lTFhU=/211ccf40189948359ab1d779072d7d6b"></figure></li><li>If you do not provide the lantern with a flow of air, it will get very hot. Make in the cover a lot of small holes, look the example:<figure><img data-image="37264" src="https://abbigli.com/thumbs/4vSaZpezwXMl9adkQbm7c016e7I=/c39a103f39c14535be3e4ffa59fccd1a"></figure><figure><img data-image="37265" src="https://abbigli.com/thumbs/bAye3hWXAv4SQ6R7lR-JvPBJAA0=/eb07996064c54825bd5a76eac8f57c36"></figure></li><li>It's time to remove the center of the lid. Take the screws or scissors, cut the circle along the line. In the process of cutting, sharp edges will appear. Fold them inside the jaw with pliers.<figure><img data-image="37266" src="https://abbigli.com/thumbs/aKhirPNdHALf3f2jz1ZK5lb-YeE=/8a76f5ef8a084cc08563621b06392c37"></figure></li><li>Insert the cartridge through the hole in the cover. Do not forget to screw the layer.<figure><img data-image="37267" src="https://abbigli.com/thumbs/mvaIv8efK3dRITyLloK-L3LzPcg=/04725bbfde1c48c6aecff96526dc853d"></figure><figure><img data-image="37268" src="https://abbigli.com/thumbs/w5BllqC1J94oOzR6XhalO4m1--E=/3198b2974c67486d8352e86d6c61d9c9"></figure></li><li>Now you can screw the lamp and the whole of this design. Close the jar tightly with a lid.<figure><img data-image="37269" src="https://abbigli.com/thumbs/4u3woqexdv1ONayTV_hc0DxCems=/c5e9ff2582dc4fc497df7bf69b664142"></figure><figure><img data-image="37271" src="https://abbigli.com/thumbs/Mq-Cksd_6utSM1j8o7AeJSmBWeo=/c39a5905dc164e869846b4d22c24f7e8"></figure></li><li>Vintage lamp "antique" is ready!</li></ol>
<p> So there is a huge diversity of DIY lampshade ideas and you can find it on the Internet. But now I hope you taught how to make your own lampshade and this tutorial helped you to get knowledge of how to make lamp shades. Use it, enjoy it and share with your own ideas! </p>
Категория:Electronics